
Clothing Tech Pack Examples: T-Shirts, Hoodies & Other Garments Explained
A great tech pack does one job well, it removes guesswork. When your factory can see exactly what you mean, down to stitch type, label placement, and finished measurements, sampling moves faster, revisions drop, and costing becomes easier to control.
Below you will find a practical t-shirt tech pack example, a hoodie tech pack example, and a few broader garment tech pack examples that show how detail shifts by product. Use them as a reference for your next clothing tech pack example, or as a checklist to tighten up the template you already use.
What a tech pack needs to include for production
At its simplest, a tech pack is a set of instructions a supplier can follow without having to interpret your intent. Most production-ready packs share the same building blocks.
- Style overview: style name or number, season, size range, target fit notes
- Technical sketches: front and back flats, stitch lines, placement points, callouts
- Bill of materials (BOM): fabric, trims, labels, packaging, colourways, supplier references
- Construction details: seam types, stitch type, finishing, reinforcements, tolerances
- Measurements and grading: points of measure (POM), base size spec, grade rules, tolerances
- Artwork and branding: print files, embroidery notes, label artwork, placement and sizes
- Comments and approvals: revision history, dates, who approved what
If you keep this backbone consistent, you can build garment-specific pages (like a hood drawcord spec or a collar stand detail) without reinventing the whole pack each time.
What these tech pack examples look like in Zedonk
A tech pack is easier to use when information is both structured and visual. Zedonk’s PLM Software Z Studio supports the main elements you need to keep a pack clear for suppliers and manageable for your internal team.
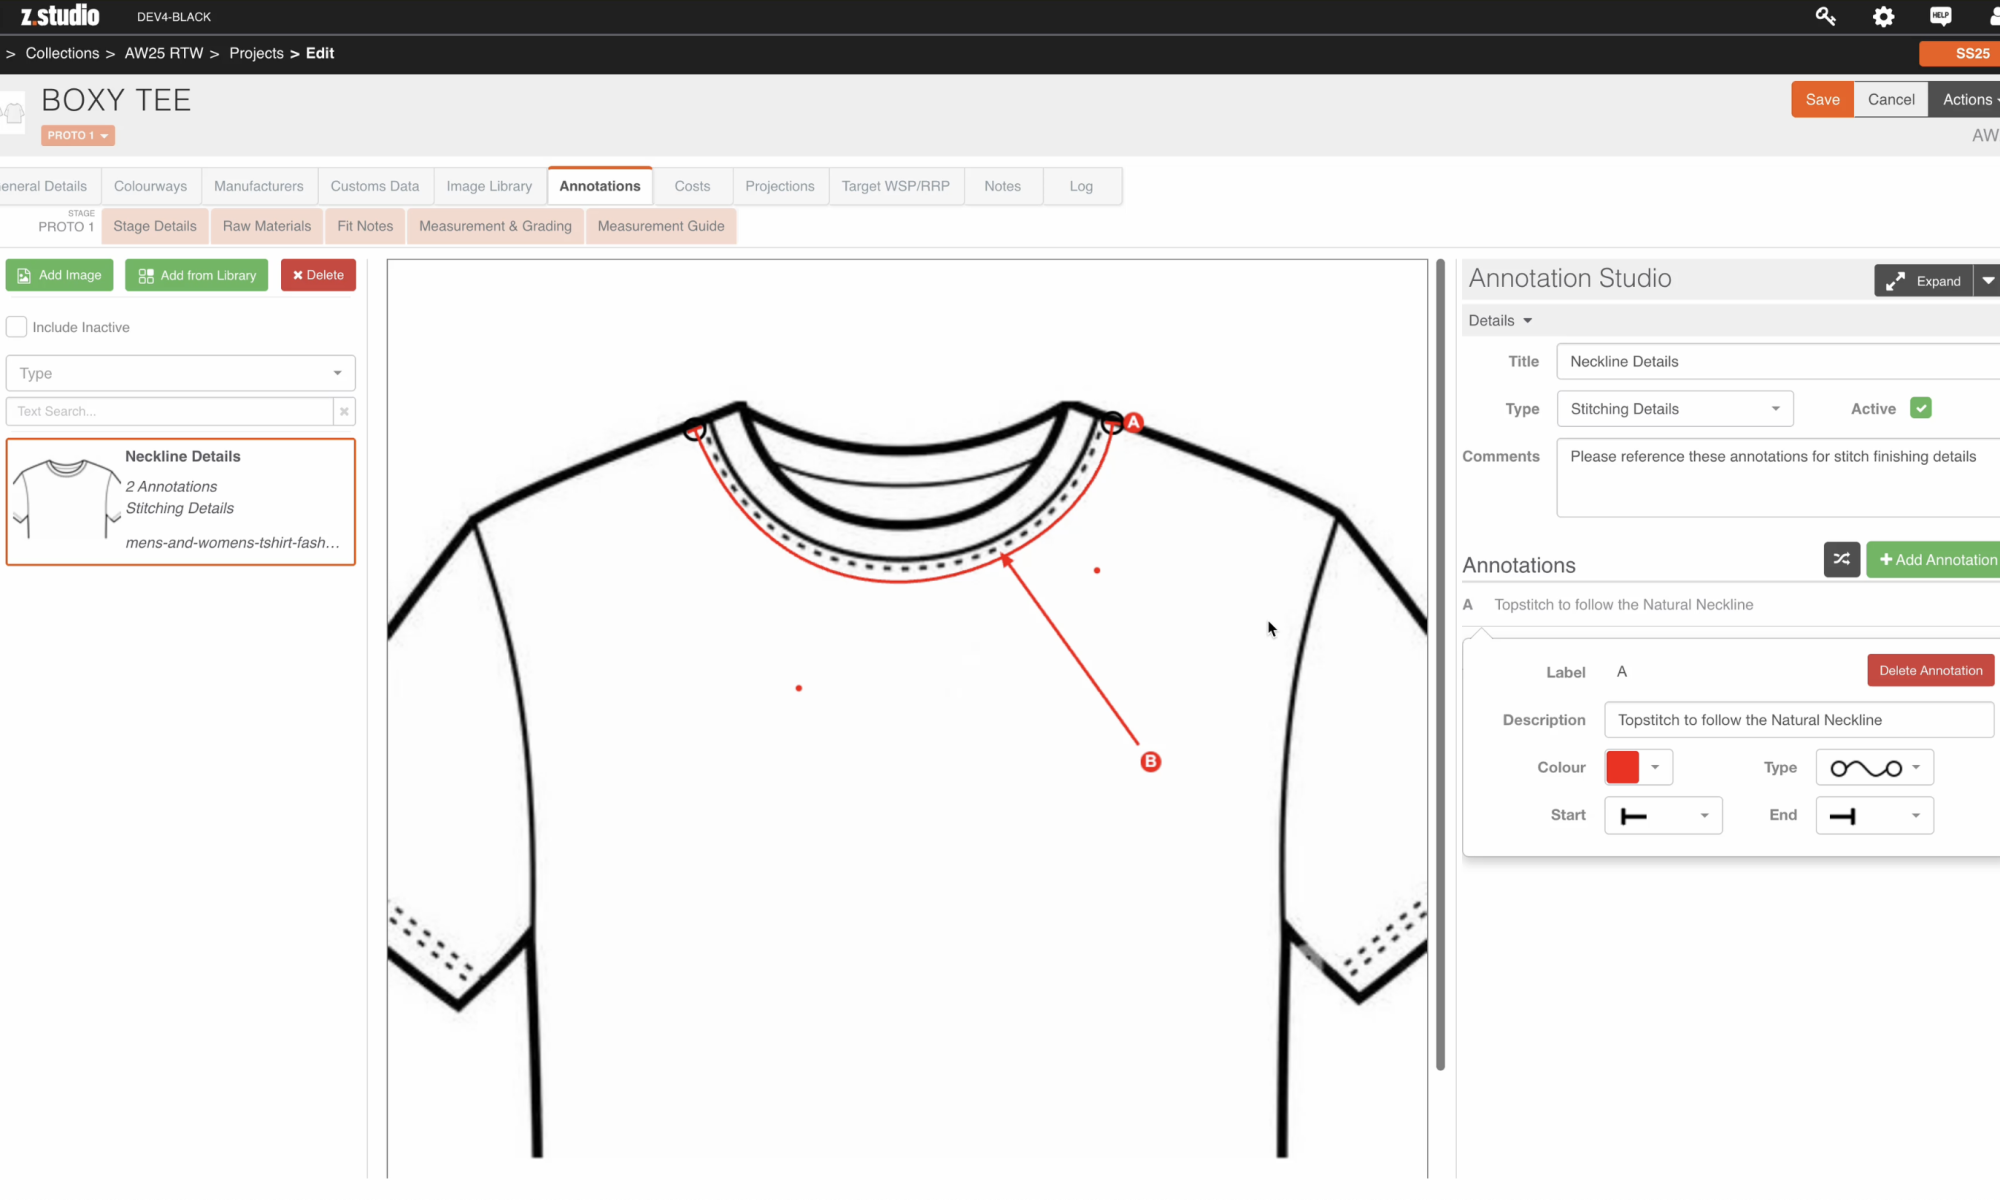
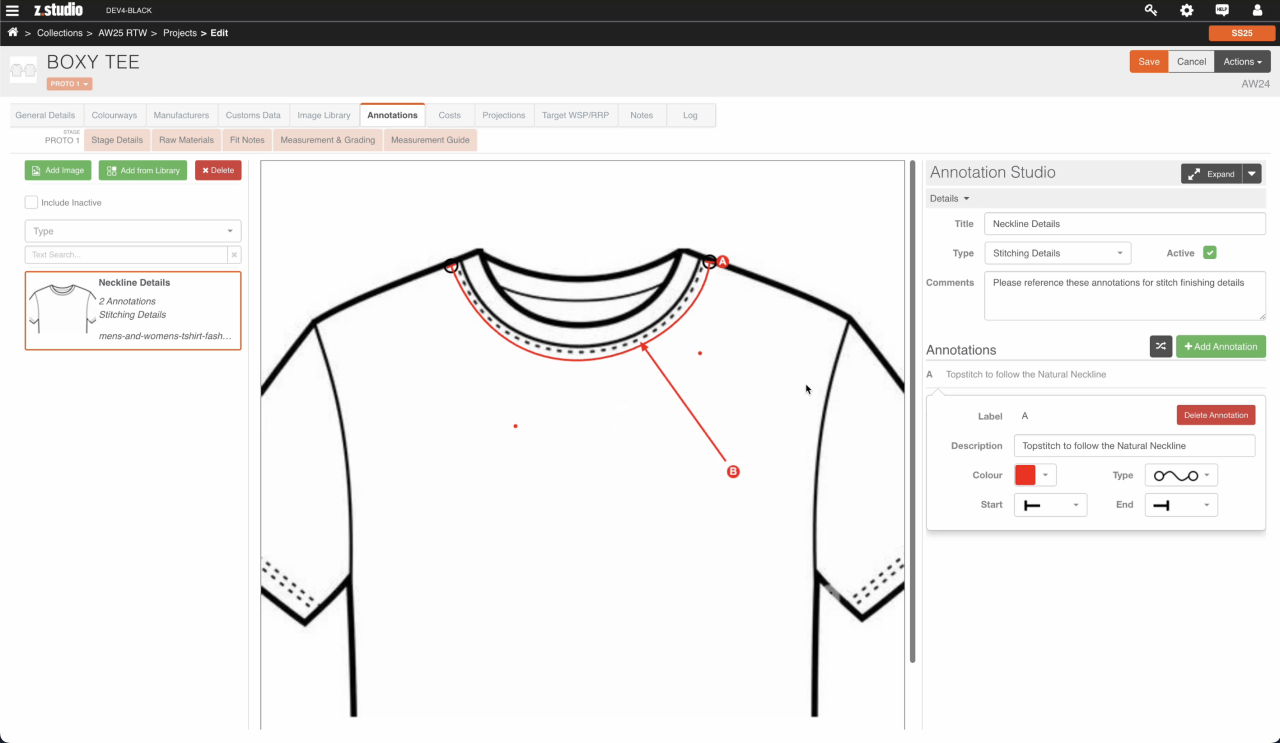
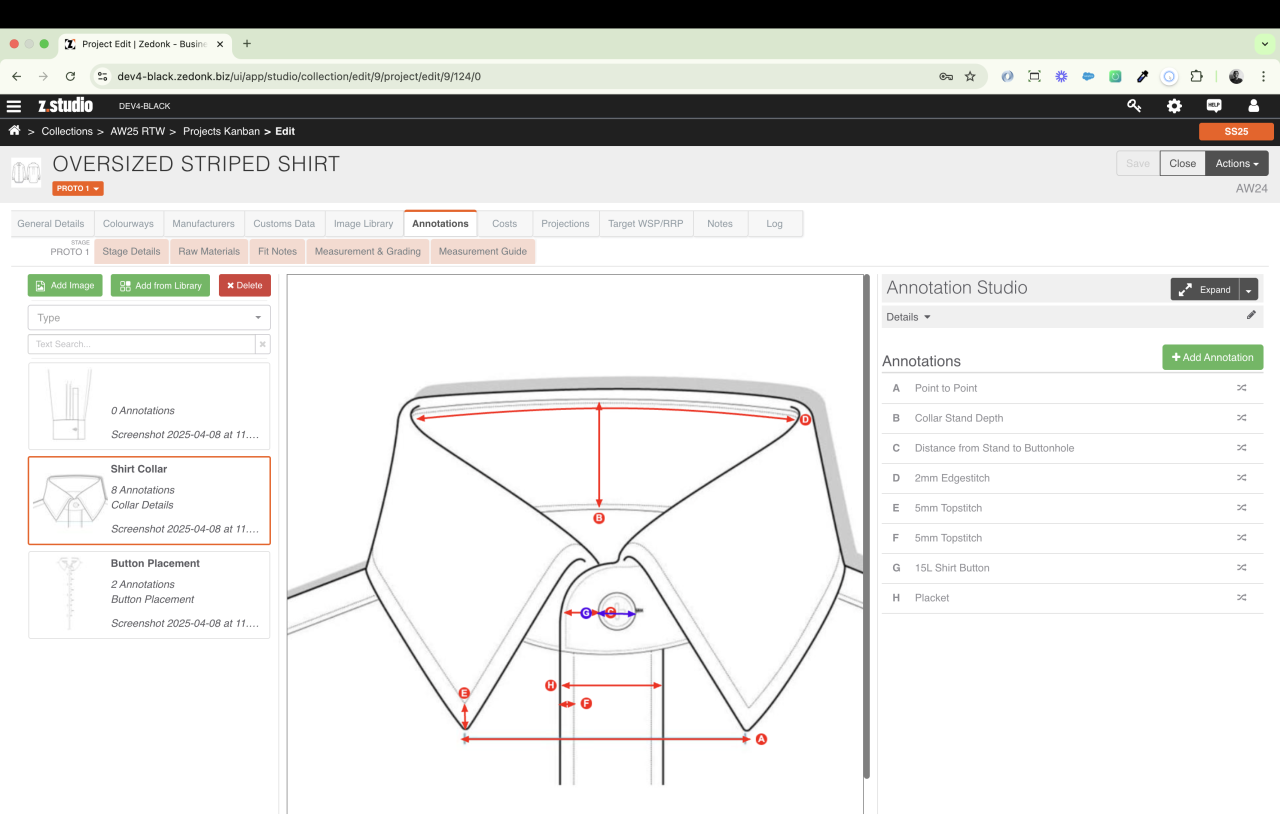
Annotated technical drawings
Instead of writing long explanations for a neckline finish or collar construction, you can add callouts directly onto the technical sketch using Annotation Studio. This works well for details that are easy to misunderstand, such as:
- point-to-point measurements (across a collar, placket, or pocket opening)
- stitching details (for example, topstitch type, distance from edge, where it starts and ends)
- placement distances (buttonhole spacing, eyelet position, label placement from a seam)
- component details (edge stitch notes, seam topstitch, placket finish)
The aim is simple: when someone opens the pack, they can follow the garment like a map.
Measurement and grading tables
Fit issues usually come down to small measurement misunderstandings. In Z Studio, measurements sit in structured tables where you can set a sample base size, list your POMs, show size columns across the range, and include tolerances. That reduces ambiguity around how a chest scales from S to XL, and what must stay within tolerance.
Project stages, approvals, and range visibility
Tech packs do not live in isolation, they move through sampling stages and sign off. Zedonk’s Projects Kanban view helps you track styles through stages such as PROTO 1, PROTO 2, SMS, PPS, and GOLD SEAL, with each card showing the style sketch and key identifiers. That visibility reduces the “where are we with this” back and forth, and keeps technical changes tied to the stage you are actually in.
Image libraries and reference files
Tech packs rely on sketches, reference photos, fabric scans, label artwork, and supplier PDFs. Keeping those assets attached to the style helps you brief suppliers faster and prevents the wrong file being used. Zedonk supports adding imagery and supporting files against a style, including pulling from an image library, so the pack stays self-contained.
With that context in place, here are condensed examples you can adapt.
T-shirt tech pack example: specifications and measurements
A tee looks simple, which is why it is a great test of whether your template captures the essentials.
Style details
- Style name: Classic crew neck tee
- Fit: Regular, slightly boxy through the body
- Fabric: 100 percent cotton single jersey, 180gsm
- Colourways: Black, white, seasonal colour (Pantone referenced)
- Key details: Set in sleeve, 1×1 rib neck, coverstitch hems
Construction notes
- Shoulder seam: 4 thread overlock, topstitch 1 needle 3mm from seam
- Neck: rib band, 10mm finished, attached with overlock, coverstitch around neckline
- Sleeve hem: 20mm turnback, 2 needle coverstitch
- Body hem: 25mm turnback, 2 needle coverstitch
- Reinforcement: neck tape inside back neck, 12mm herringbone or self fabric
Measurement spec (base size M)
| POM | Description | Size M | Tolerance |
|---|---|---|---|
| A | Chest (1 inch below armhole) | 56.0cm | ±1.0cm |
| B | Body length (HPS to hem) | 72.0cm | ±1.0cm |
| C | Shoulder | 16.5cm | ±0.5cm |
| D | Sleeve length | 22.5cm | ±0.8cm |
| E | Sleeve opening | 19.5cm | ±0.5cm |
| F | Neck width | 20.0cm | ±0.5cm |
Add grade rules beneath the table (for example, chest +2.5cm per size, body length +1cm per size). A clear base size plus grade rules is what turns a clothing tech pack example into something a factory can trust.
Branding and labelling
- Main label artwork and placement (centre back, 1cm below neck seam)
- Care label copy (include language requirements if you sell across markets)
- Print or embroidery files, colours, size, and placement from HPS
Hoodie tech pack example: trims, construction, and placement
A hoodie has more components, which is why a hoodie tech pack example needs a stronger BOM and clearer callouts.
Style details
- Style name: Pullover hoodie
- Fit: Relaxed, drop shoulder
- Shell: cotton poly fleece, 330gsm, brushed back
- Rib: 2×2 rib for cuffs and hem
- Colourways: heather grey, black
BOM (sample)
- Main fabric: 330gsm fleece, shrinkage tested
- Rib: 2×2 rib, matched dye
- Drawcord: flat cotton cord, 12mm, 130cm length
- Eyelets: metal, 6mm ID, rust-free finish
- Thread: poly core spun, match colour
- Labels: woven main label, satin care label
Construction and callouts
- Hood: two-piece hood, double layer, centre back seam, topstitch 6mm from seam
- Pocket: shape template, bartacks at pocket openings
- Cuffs and hem: attach rib with overlock, secure with coverstitch
- Seams: 4 thread overlock, reinforced with twin needle topstitch if required
- Eyelets: placement 35mm from the hood edge, include distance between eyelets
Measurements to include
Keep your table focused, but include hoodie specific points: chest, body length, sleeve length, bicep, cuff opening, hem opening, hood height and opening, pocket width and height.
Other garment tech pack examples: what changes by category
Once you have a t-shirt tech pack example and a hoodie tech pack example, the same structure applies across categories. The difference is in where you add detail.
Dresses
Dress garment tech pack examples often need more notes on shaping and finishing. Call out darts or panels, lining construction, zip type and placement, hem shape, and a finished sweep measurement.
Trousers and skirts
These garment tech pack examples tend to be trim-heavy. Be specific about waistband construction, interfacing, closures, pocket shapes and reinforcement points, fly construction, and topstitch distances. Make sure the measurement list covers rise, thigh, knee, hem opening, and grade rules.
Outerwear basics
Even without complex 3D development, outerwear benefits from extra clarity. Include layering order (shell, insulation, lining), topstitching maps, seam sealing requirements if relevant, and hardware placement notes with backing materials.
Small habits that make every tech pack more useful
Small habits make the difference between tech packs that look complete and tech packs that actually get followed. When you review strong clothing tech pack examples, they are rarely more detailed, they are more disciplined. Clear version control, consistent structure, and explicit approvals reduce supplier questions and prevent small changes from turning into costly errors later in production. Remember to:
- Date every change and keep a clear revision history
- Define what must not change (fabric weight, measurement tolerances, branding placement)
- Export and share one clear pack with artwork and references attached, rather than scattering files across emails
- Be explicit about approvals, what is approved for sampling, what is still under review
If you want to build, store, and update tech packs in one place, reach out to us or explore our Z Studio fashion PLM solution.

 A New Sampling & Tech Pack Solution from Zedonk.